Today I are going to talk about charts and finding ways to make them smaller so they can be bigger in the pattern! (I know that sounds weird, but bear with me!)
For the sake of this discussion I took a repeating lace pattern and charted it out to a 39 stitch wash cloth.
The Chart looked like this:

One way to reduce the stitches and rows in the chart would be to take the borders out and just list them in the written portion of the pattern...so in this case I could say :
Cast On 39 stitches.
Rows 1- 3: Knit.
Row 4: K3, place marker, k to last 3 sts, place marker, k3.
Following Rows:
K3, slip marker, work chart over next 36 stitches, slip maker, K3.
Final Rows 1-4: Knit.
Bind off loosely.
And the chart would look like this:

Which is a little bit better, but we can make it smaller (bigger) by using pattern repeats...but where to put them?
Disclaimer : Every designer has their own method for this, none are wrong, this is just how I do it!
Let's find a landmark! I look for stitches that remain pretty constant throughout the pattern, so if there is a column of plain stitches all the way up the chart I start there. (In this case, there isn't, so I looked for the stitches with the least amount of "action steps".)


Now as charted, that is a fully workable repeat but, if your knitter uses stitch markers to help keep track of where they are in the repeat, they will have to move the markers...this very messy color coded chart shows where the stitches end up on the following row, just track each color up to see when it lands.

So while the stitch that I picked as my "beginning of repeat" does have the least action, it isn't the wisest choice for where to put the repeat...let's try again!

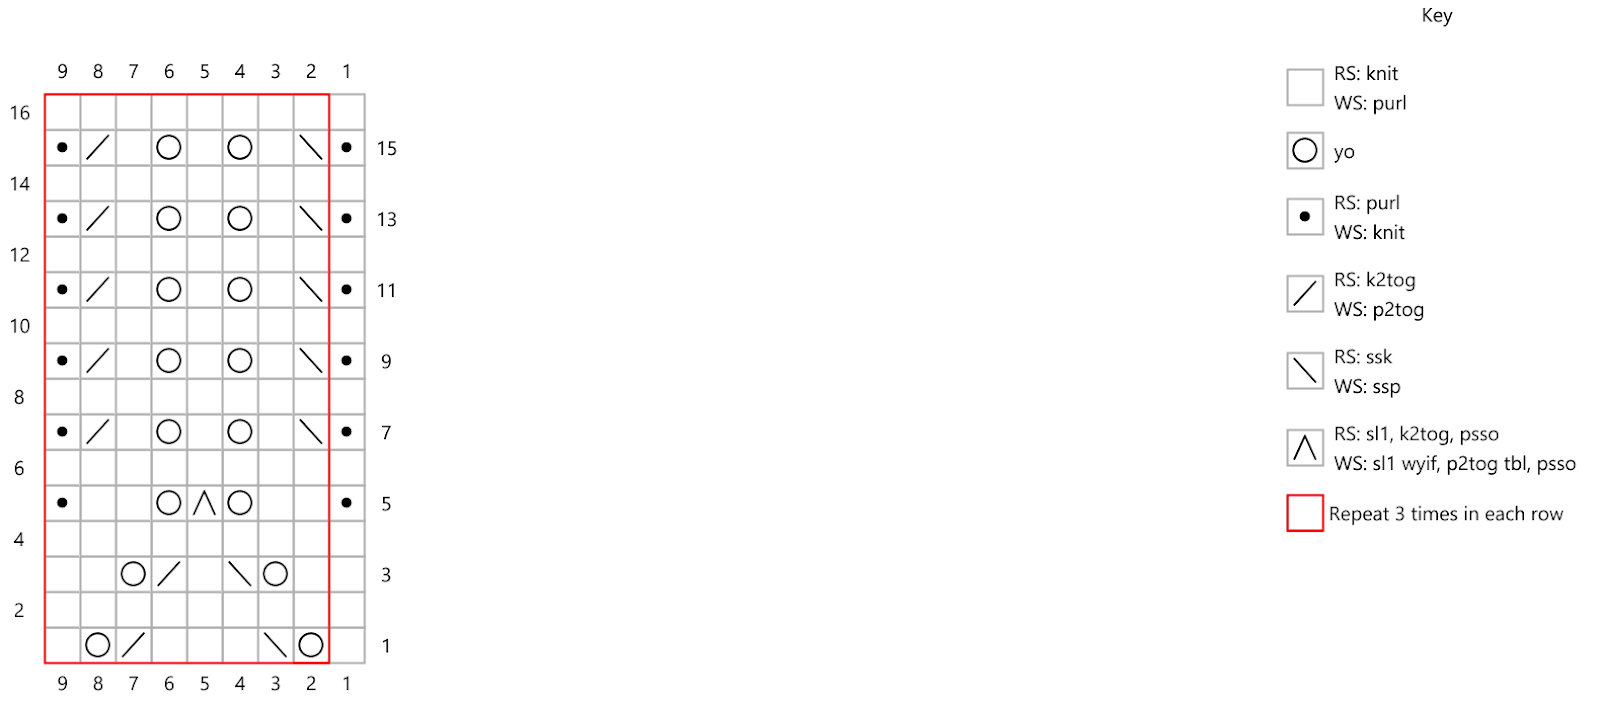
By centering the double decrease between the yarn overs, now the stitch markers won't have to be moved!
And...we can reduce the chart size even more.
Does changing where the pattern repeat is to make it so that stitch markers don't have to move or to make the chart appear larger on the page make a difference? In my opinion, yes. It makes the pattern easier to follow for the knitter and shows that I, the designer, care about their knitting experience!.
For those who are wondering, the stitch pattern is called Arrow according to my stitch dictionary and this is what the chart looks like knit up!

~M
No comments:
Post a Comment